
Printed Sides Placeholder
There are a variety of substrates we can mount your print on. Please look at the options on this page: https://shop.eagleeyesigns.net/materials
Masking your print is an excellent way to protect it during installation. It is also required if you are installing a contour cut print with lots of little pieces.
Trimming Placeholder
If there is one thing that will extend the life of your prints, it is lamination. We highly recommend lamination for all prints. It protects not only from scratches but UV light which degrades the colors in the ink/pigment and will eventually turn them all a washed out blue like the old posters you see in windows.
You are only shown compatible options for laminating your chosen material.
You can read more about the available laminations here: https://shop.eagleeyesigns.net/materials
The variety of materials you can choose to print on are described here: https://shop.eagleeyesigns.net/materials
You can choose to have us not weed and mask your vinyl. You will get the cut vinyl only.
We will mirror your file, so the adhesive will be on the front of your lettering, and you can apply to the inside of a window or other transparent material.
Vinyl Material Placeholder
You have to option for single or double sided signs. We highly recommend if you are having different designs on either side, that you label your files with xxx.SideA.xxx, this is even more important if there are several designs, each with different artwork. So we recommend, Sign1.SideA.xxx type of naming system.
For your convenience, we have added all the materials we stock below on the page. Take a look to see which materials is best for your project.
Coroplast flutes are what give the material it’s strength, while leaving it exceptionally light. The disadvantage is that if you choose the wrong flute direction for your application, the signs can fold up on themselves in a strong wind.
Horizontal flutes perform best when you are mounting your sign on vertical pole(s).
Vertical flutes are primarily for use with H-Stakes, or if you are mounting the sign on horizontal cross bar(s).
If you are mounting to a wall or in a frame, then the flute direction really won’t matter.
H-Stakes or the easiest way to place yard signs with no tools required for installation.
Coroplast flutes are what give the material it’s strength, while leaving it exceptionally light. The disadvantage is that if you choose the wrong flute direction for your application, the signs can fold up on themselves in a strong wind.
Horizontal flutes perform best when you are mounting your sign on vertical pole(s).
Vertical flutes are primarily for use with H-Stakes, or if you are mounting the sign on horizontal cross bar(s).
If you are mounting to a wall or in a frame, then the flute direction really won’t matter.
We need to know your signs orientation so we know which direction the flutes of the coroplast are running. If your artwork is taller than wide, then it is portrait. IF your artwork is wider than tall, it is landscape.
You have to option for single or double sided signs. We highly recommend if you are having different designs on either side, that you label your files with xxx.SideA.xxx, this is even more important if there are several designs, each with different artwork. So we recommend, Sign1.SideA.xxx type of naming system.
In the past there has been come confusion on pocket sizing. We will attempt to clarify below.
The pole pocket size is within your finished size, and do not extend beyond. Therefore, when you are creating artwork you will need to give yourself some extra clearspace where you dont put anything important that you don’t want us sewing through, like text. See below:
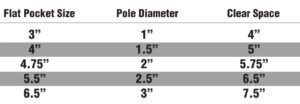
Pole pockets allow you to hang your banner on, what for it…a pole. You can even use a pole pocket at the bottom with a pole it in to keep your banner hanging straight. Select which sides you need pockets on, then select the diameter/size of the pole pocket below.
We use 1″ white Velcro. We will sew the hook side to your banner (unless you request otherwise) and leave you with the loop side to attach.
We use 1″ wide white nylon webbing. If there is one thing that can greatly extend the life of your banner it is webbing. Webbing creates an almost unbreakable frame around your banners, gives grommets and hemming a durable structure to attach to. You really can’t go wrong adding webbing.
Webbing with Extensions: We sew the webbing around the perimeter, and leave extensions out the top and bottom of each side that are 6ft long. These are great for tying off the banner, or even using ratchet/tension systems. All the tension goes thru the webbing and not the banner.
Webbing with O-Rings: Same as with extensions, but we loop and sew in an o-ring at each corner to give you something to tension the banner with.
We typically space our grommets at +/-24″ on center (since we have to some in .75″ from the edges to center on the hemmed area). The spacing between the grommets is consistent on each side with the same length. A rule of thumb, when we go up or down 6″ in the spacing, we add another grommet, so your 24″ spacing could be anywhere from 18″ to 30″.
As an example, if you order a 90″ x 30″ banner with standard 24″ spacing, we will put a grommets in each corner, and then two additional grommets on the top and bottom, all spaced at 22.125″ on center. The sides will not get an extra grommet, since the center to center is 28.5″. If you ordered 12″ spacing, you would end up with 7 grommets across the 90″, all spaced at 12.6″, and 3 grommets on the short sides spaced at 9.5″
If you have a specific grommet pattern you need, possibly to attach to existing hardware, let us know. We may request you put the marks in your artwork.
We use #2 brass grommets, set with a big pheumatic machine. These give you excellent attachment points, and rarely (if ever) rip out when the banner is hemmed. If your banner will be in a high wind load situation, we recommend adding extra grommets. For interior applications you can get away with less.
Nickel/Silver grommets MAY be available upon request with an additional charge. Please call us about this option.
An explanation of our trimming & hemming options.
Trim and Hem, you will receive your banner with hemmed and finished edges. Trim and hem is REQUIRED for all options other than grommets.
Trim only, we will trim your banner to the finish size.
No Trim, we will cut the print off the roll of material for you. The cut may be rough, and we typically leave 2+ inches around your print in case you want to hem it yourself. For white banners, we will put a thin outline on the print at your banners edges so we don’t cut into your finish area.
This is the measurement of your finished size, and is used to calculate your pricing. Please double check your measurements, maybe even triple check them against your artwork. Input of the incorrect size is our #1 non-art related issue with orders.
All orders placed before 10:00am have that day counted as a production day.
Standard Turnaround
Our typical turnaround for jobs is 2 to 3 production days.
Next Day Rush
We will have the order fulfilled and ready for pick-up, or shipped on the next production day.
Same Day Rush
For orders before 10:00am, we will fulfill your order the same production day. For orders after 10am, it will be the following day.
All our banner materials are durable and suitable to outdoors, except the Ultrasmooth Fabric which is for interior use.
13 and 18oz Ultraflex Matte, have smooth printing surfaces, a matte finish so glare doesn’t disrupt your message. 13oz is durable, but if you need a banner to survive abuse from wind or humans, we recommend going with 18oz. For areas with high winds, we recommend mesh, as we do not cut windslits.
9oz Mesh, our goto material for high wind applications and fences, so you don’t create a high wind load. We highly recommend webbing be added to all mesh banners to give the grommets extra support from ripping out. But in low stress applications you can probably get away with no webbing.
15oz Gloss Reflective, when ya just want that extra pop. Recommended for those directional banners that drivers need to see at night in low light situations.
Ultrasmooth Fabric, This material shines for tradeshows and photo backdrops. Not recommended for outdoor use.